Adding Calendly to a WordPress website built with Elementor does not require a dedicated booking plugin. In most cases, you can copy the embed code generated by Calendly, place it in Elementor, and publish the page.
The installation itself takes only a few minutes. The part that deserves more attention is everything around the embed: choosing the right Calendly layout, giving the scheduler enough space, making it work properly on mobile, preventing unwanted scrollbars, and checking that caching or JavaScript optimization does not interfere with the booking process.
This guide walks through the complete process and also covers the problems that commonly appear after a Calendly embed has been added.
What You Need Before Adding Calendly to Elementor
Before opening Elementor, make sure you already have the Calendly booking page or event you want visitors to use.
For example, you might have:
- A 30-minute consultation
- A discovery call
- A sales meeting
- A dental consultation
- A project consultation
- A support appointment
You can embed a single event or, depending on your Calendly setup, a broader scheduling page that presents available event types.
It is worth deciding this before building the Elementor section. A visitor who is ready to book usually benefits from seeing the correct appointment immediately rather than being asked to make several choices first.
Calendly Embed Options: Which One Should You Use?
It provides three main embed options for adding scheduling to a website:
- Inline embed — the scheduler appears directly on the page.
- Pop-up text — a text link opens the scheduler in a pop-up.
- Pop-up widget — a floating button opens the scheduler.
Calendly documents all three options for website embedding.
For an Elementor website, the best choice depends on the purpose of the page.
Use an inline embed for a dedicated booking page
If you have a page such as:
/book-a-call/
an inline calendar is usually the most straightforward choice.
The visitor lands on the page, sees the available times and can start scheduling immediately.
Use a pop-up for a homepage or landing page
A large scheduling calendar can take up a significant amount of space. If booking is only one of several actions available on your homepage, a pop-up can keep the design cleaner.
For example, an Elementor button could say:
Book a Consultation
The visitor clicks the button and Calendly opens without replacing the page with a large calendar.
Use a pop-up widget when booking needs to remain accessible
A floating Calendly widget can work well when you want visitors to be able to schedule from multiple parts of a site without adding a large booking section to every page.
The important point is that there is no universally “best” embed type. Choose the one that matches the visitor’s intent and the role of the page.
Step 1: Get Your Calendly Embed Code
Log in to Calendly and open the scheduling area.
Find the event or scheduling page you want to add to WordPress. Calendly’s current process is to select the relevant page or event, choose Add to website, select the embed type and then copy the generated embed code.
For a typical Elementor booking page, select Inline Embed.
Calendly will generate code similar to this:
<!-- Calendly inline widget begin -->
<div class="calendly-inline-widget"
     data-url="https://calendly.com/your-name/30min"
     style="min-width:320px;height:700px;">
</div>

<script type="text/javascript"
        src="https://assets.calendly.com/assets/external/widget.js"
        async>
</script>
<!-- Calendly inline widget end -->
Your actual Calendly URL will be different.
Do not replace the URL with a guessed address. Copy the URL generated for the specific event or scheduling page you want to use.
The data-url tells Calendly which scheduling experience to load, while the external widget.js file provides the JavaScript required to turn the container into the Calendly interface.
Step 2: Add Calendly to Elementor
Open the WordPress page and select Edit with Elementor.
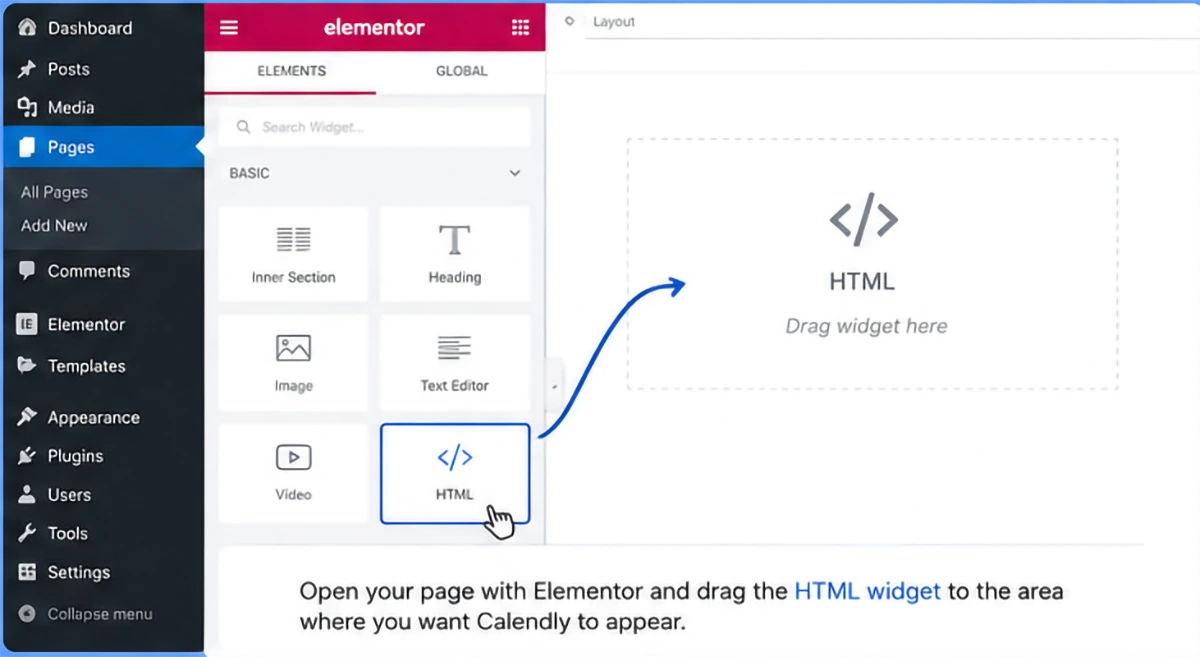
For the most direct implementation, add an HTML widget where you want the scheduler to appear and paste the Calendly code into it.
Elementor’s HTML widget supports HTML, CSS, JavaScript and shortcodes, making it suitable for third-party embeds such as Calendly.
Calendly’s current WordPress documentation also specifically describes using Elementor’s Shortcode widget and pasting the full Calendly embed code there.
So which should you use?
HTML widget vs Shortcode widget
For a straightforward Calendly installation, either can be used according to the current documentation.
I generally prefer the HTML widget when working directly with Calendly’s generated HTML and JavaScript because it makes the implementation clear and keeps the third-party embed together in one place.
The important thing is not the widget name. It is that the Calendly code is inserted correctly and the surrounding Elementor container is configured properly.
Step 3: Give Calendly Enough Space in Elementor
This is where a simple copy-and-paste tutorial often stops too early.
Calendly is not just a piece of text sitting inside your Elementor page. The booking interface needs enough horizontal and vertical space to render properly.
A useful Elementor structure is:
Booking section
│
├── Heading
├── Short introduction
└── Calendly embed
Give the Calendly embed its own container whenever possible.
Avoid placing it inside a very narrow column simply because that column happens to be available.
A narrow parent container can change how the scheduler is displayed and can make the booking experience unnecessarily cramped.
For example, instead of:
50% column
└── Calendly
consider giving the scheduler a wider content area:
Full-width section
└── Centered content container
    └── Calendly
You can still control the maximum width of the overall section through Elementor so that the page does not become excessively wide.
The goal is to give Calendly room while keeping the surrounding page visually balanced.
Step 4: Set the Calendly Height Correctly
The height in the generated embed code is one of the settings you may need to adjust.
A common starting point is around 700px:
style="min-width:320px;height:700px;"
That is a starting point, not a universal rule.
The correct height depends on the booking flow, the amount of information displayed, the device width and whether you are using a standard fixed-height embed or an auto-resizing implementation.
If the bottom of the calendar is cut off, increase the available height.
For example:
<div class="calendly-inline-widget"
     data-url="https://calendly.com/your-name/30min"
     style="min-width:320px;height:750px;">
</div>
But avoid simply setting the height to something enormous such as 1,500px to hide a layout problem.
That can create a large empty area below the scheduler, particularly on desktop.
The better approach is to test the actual published page and adjust the height based on what the visitor sees.
Make Sure Calendly Works on Mobile
Never judge a Calendly integration only from a large desktop monitor.
A layout that looks fine at 1440px wide can behave very differently on a 390px phone.
Test the booking page at:
- Desktop width
- Tablet width
- Small mobile width
- A real mobile device when possible
Pay particular attention to:
- Calendar visibility
- Date navigation
- Available time slots
- Text wrapping
- Buttons
- The bottom of the booking interface
- Horizontal scrolling
- Unexpected vertical scrolling
- Space above and below the embed
If the calendar appears to be cut off on a phone, first inspect the Elementor container and the embed height.
Do not immediately assume that Calendly itself is broken.
Fix the Extra Scrollbar in Elementor
One of the most useful Calendly-specific fixes for Elementor is also one that many basic tutorials completely miss.
Calendly documents an Elementor issue where overflow-y: auto can be added to the Calendly widget and create an unwanted scrolling area.
If the calendar works but you see a second scrollbar inside the page, inspect the widget and its parent containers.
Calendly provides this CSS approach:
.calendly-inline-widget {
    overflow-y: hidden !important;
}
Add this only when the extra scrollbar is actually caused by the Calendly widget.
Do not apply CSS blindly just because you have seen the snippet in a tutorial. If the page has a legitimate scrolling container, hiding overflow could mask a different layout problem.
A good troubleshooting process is:
- Confirm the Calendly scheduler itself loads.
- Check whether the extra scrollbar is inside the Calendly area.
- Inspect the widget’s computed CSS.
- Check the Elementor parent containers.
- Apply the overflow fix if appropriate.
- Test desktop and mobile again.
This is much safer than adding random CSS until the page “looks right.”
How to Make Calendly Match Your Elementor Design
Calendly is an externally rendered scheduling interface, so it should not be treated like a normal Elementor widget.
You have considerable control over the space surrounding the scheduler, but you do not have unlimited control over every element inside Calendly through Elementor’s normal typography and button controls.
Instead, concentrate on integrating the scheduler naturally into the page.
You can control things such as:
- Section background
- Content width
- Spacing
- Padding
- Border treatment
- Border radius around the containing section
- Heading
- Supporting copy
- Layout around the calendar
- Desktop and mobile spacing
For example:
Book a 30-Minute Consultation
Choose a convenient time below. After booking, you’ll receive your confirmation and meeting details.
[Calendly scheduler]
That small amount of context can make the booking experience much clearer.
If necessary, explain:
- What the appointment is for
- How long it takes
- Whether it is online or in person
- What the visitor should prepare
- What happens after booking
There is little benefit in decorating a booking section with unnecessary visual elements. Once somebody reaches the calendar, the priority should be clarity and a low-friction booking process.
Avoid Repeating Information Inside and Outside Calendly
One useful design improvement is to look at what Calendly is already displaying before adding more text to the Elementor page.
For example, if Calendly is already showing the event name, duration and description, you may not need to repeat all of that information immediately above the calendar.
Calendly currently provides options for hiding event details when you have already presented that information elsewhere on your page.
This can make a booking page considerably cleaner.
A good rule is:
Let Elementor explain the offer. Let Calendly handle the scheduling.
That division keeps the page easier to scan and avoids making visitors read the same information twice.
Adding Calendly to an Elementor Popup
Calendly can also be used inside an Elementor popup.
This can be useful when an Elementor button such as Book a Consultation should open the scheduling experience without sending the visitor to another page.
However, there is an important distinction between using an inline Calendly embed and using Calendly’s popup implementation.
If the scheduling interface should open after a click, use Calendly’s popup embed rather than placing an inline scheduler inside a hidden element simply because the inline code is already available.
Calendly provides dedicated pop-up text and pop-up widget embed types for this purpose.
A practical popup workflow
- Create your Elementor button.
- Decide whether the button should open an Elementor popup or Calendly’s own popup.
- Generate the appropriate Calendly embed from Calendly.
- Add the required code.
- Publish the page.
- Test the button on desktop and mobile.
If you use an Elementor popup containing an inline Calendly widget, pay particular attention to the popup’s dimensions.
A hidden parent can make it harder for embedded content to determine its available dimensions.
If Calendly looks compressed after the popup opens, inspect the popup container before rewriting the Calendly code.
Adding Calendly to an Elementor Button
If the goal is simply to let visitors click a button and start booking, a popup is often more appropriate than displaying a large calendar on every page.
For example:
Book a Consultation
can open the Calendly scheduler when clicked.
This works particularly well for:
- Homepage calls to action
- Service pages
- Sales landing pages
- Blog articles
- Contact pages
- Consultation pages
The advantage is that the page remains focused on its primary content until the visitor indicates that they are ready to schedule.
Do You Need a Calendly WordPress Plugin?
Not necessarily.
If your requirement is simply to display a Calendly scheduler on an Elementor page, the direct embed method is usually enough.
The basic architecture is:
Calendly
   ↓
Embed code
   ↓
Elementor
   ↓
WordPress page
Installing another plugin just to insert the scheduler can add another layer between Calendly and your website.
That does not mean every Calendly-related plugin is unnecessary. A plugin can make sense if you need additional functionality that the standard embed does not provide.
But for a simple booking calendar, first ask whether the plugin is actually solving a problem you have.
Every additional plugin can also become another potential point of interaction with caching, JavaScript optimization, security rules, Elementor and other integrations.
Calendly and WordPress Performance Optimization
Third-party JavaScript deserves special attention when you optimize an Elementor website.
Calendly needs its external JavaScript to create the scheduling interface. If a WordPress performance plugin delays, combines, defers or otherwise modifies that script in a way Calendly does not expect, the scheduler may stop working.
Typical symptoms include:
- Blank space where Calendly should appear
- Calendar loading indefinitely
- Scheduler appearing only after refreshing
- Popup button not responding
- JavaScript console errors
- Booking interface loading inconsistently
If Calendly stopped working immediately after you changed a performance setting, investigate that change before rebuilding the embed.
The Calendly script is loaded from:
assets.calendly.com
Do not automatically exclude the entire domain from every optimization feature. Instead, identify which optimization is interfering with the scheduler and make the smallest necessary change.
This is especially important on websites where booking is a primary conversion.
A slightly lower performance score is usually a much smaller problem than a “Book Now” button that does nothing.
How to Troubleshoot Calendly After Enabling a Caching Plugin
When debugging a performance conflict, avoid changing several settings simultaneously.
A better process is:
Change one setting → clear the relevant cache → test Calendly → record the result.
Then move to the next setting.
Check:
- JavaScript delay
- JavaScript defer settings
- Script combination
- Minification
- CDN optimization
- Cloudflare JavaScript features
- Cache behavior
- Cookie/consent scripts
If Calendly works when one feature is disabled and stops working when it is enabled, you have a much stronger indication of where the conflict is coming from.
This is far more reliable than repeatedly replacing the embed code.
Cloudflare and Other Optimization Layers
Cloudflare and similar services can introduce another layer of JavaScript optimization.
If Calendly works correctly when an optimization feature is disabled but fails when it is enabled, test that feature independently.
Do not disable your entire performance setup permanently just because one third-party script has a conflict.
The objective is to find the smallest compatibility change that keeps both the website and booking system working.
After making the change, test the actual published page rather than relying only on the Elementor editor.
Using Calendly Auto-Resize
For more advanced implementations, Calendly currently supports an auto-resizing option.
With the standard embed, this can be enabled with data-resize="true":
<div class="calendly-inline-widget"
     data-url="https://calendly.com/your-name/30min"
     data-resize="true"
     style="min-width:320px;height:700px;">
</div>

<script src="https://assets.calendly.com/assets/external/widget.js"
        type="text/javascript"
        async>
</script>
Calendly’s current documentation notes that auto-resizing can adjust the embed height when the content requires more space. It also recommends using only one auto-resizing embed per page and avoiding dropdowns in booking or routing forms when using this option.
This can be useful when a fixed height creates unnecessary internal scrolling.
However, auto-resizing is not automatically better for every page. Test the resulting layout on desktop and mobile, particularly if you have content immediately below the scheduler.
Advanced JavaScript Embed for Elementor
Most Elementor websites do not need the advanced JavaScript implementation.
It becomes useful when you need additional control over how Calendly is initialized.
Calendly’s current advanced embed method allows you to specify the parent element:
<div id="calendly-embed"
     style="min-width:320px;height:700px;">
</div>

<script src="https://assets.calendly.com/assets/external/widget.js"
        type="text/javascript"></script>

<script>
Calendly.initInlineWidget({
    url: 'https://calendly.com/your-name/30min',
    parentElement: document.getElementById('calendly-embed')
});
</script>
The parentElement is important because it tells Calendly exactly where the scheduler should be initialized. Calendly’s current documentation notes that without a specified parent element, the advanced widget can load at the bottom of the webpage instead of the intended location.
This approach becomes more useful when you are:
- Loading different event types dynamically
- Prefilling invitee information
- Tracking Calendly events
- Controlling when the scheduler appears
- Building a more customized booking experience
For a normal booking page, however, the standard generated embed is usually the better choice.
More code does not automatically mean a better implementation.
Prefilling Information Before Booking
Advanced Calendly embeds can also be used to prefill invitee information.
This can be useful when a visitor has already provided information elsewhere on your website.
For example, a business might collect basic contact information through an Elementor form before sending someone to scheduling.
Before doing this, consider whether collecting the same information twice is actually necessary.
If Calendly already asks for the visitor’s name, email address and other required details, duplicating those fields in an Elementor form can add unnecessary friction.
Elementor Form First or Calendly First?
There are two common approaches.
Form first
The visitor completes an Elementor form and is then taken to Calendly.
This can make sense when the business needs to qualify the lead before allowing the visitor to schedule.
For example:
Visitor
↓
Inquiry form
↓
Qualification
↓
Calendly
↓
Appointment
Calendly first
The visitor chooses a time in Calendly and provides the information required during booking.
This is often better when scheduling itself is the main conversion.
The right approach depends on what information the business actually needs before the appointment.
Avoid building a process that asks visitors for the same information twice without a clear reason.
Using Multiple Calendly Events on One Elementor Page
You can have more than one booking option on a page, but the implementation should be planned rather than simply copied and pasted several times.
For example, you might offer:
- 15-minute consultation
- 30-minute consultation
- 60-minute consultation
If each scheduler loads its own copy of the Calendly JavaScript library, the page may contain unnecessary duplicate script declarations.
The Calendly JavaScript library only needs to be loaded once for multiple embeds on the same page.
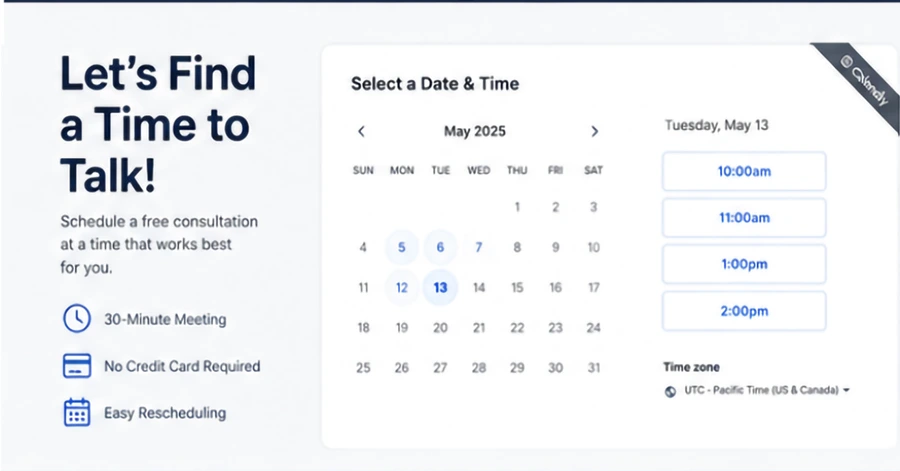
In many cases, a better user experience is to let visitors select the appointment type first and then load the relevant scheduling experience.
That keeps the page from becoming a wall of calendars.
Tracking Calendly Bookings
If the purpose of the Calendly integration is lead generation, installing the scheduler is only part of the job.
You also need to know whether visitors actually complete a booking.
There is an important difference between:
Someone clicked “Book a Consultation”
and
Someone actually scheduled an appointment.
The second action is normally the more valuable conversion.
Calendly’s current advanced embed supports event tracking through postMessage, including events such as:
calendly.profile_page_viewedcalendly.event_type_viewedcalendly.date_and_time_selectedcalendly.event_scheduled
For a more sophisticated Google Analytics 4 setup, these events can be used as signals in your tracking implementation.
Another practical approach is to send successful bookings to a dedicated confirmation or thank-you page and use that page as a conversion signal.
For example:
example.com/booking-confirmed/
This can be easier to understand when reviewing conversions because the page represents a completed booking rather than an initial interaction.
Don’t Track Only the Booking Button
Suppose 500 people click your Elementor Book Now button.
That does not necessarily mean 500 people entered the Calendly booking process successfully.
Some visitors may close the popup, some may find no suitable appointment time, some may abandon the process.
Others may actually complete the booking.
If you are evaluating SEO, Google Ads, Meta Ads or another marketing channel, distinguishing these actions can provide a much clearer picture of performance.
For more advanced implementations, Calendly’s embed events can provide additional information about where visitors are in the scheduling process.
Using UTM Parameters With Calendly
If visitors arrive from different marketing channels, attribution can become important.
For example, traffic may come from:
- Google Ads
- Organic search
- Email campaigns
A Calendly scheduling URL can contain campaign parameters when your tracking setup supports them.
For example:
https://calendly.com/your-name/30min?utm_source=facebook&utm_medium=cpc&utm_campaign=consultation
However, adding UTM parameters by itself does not guarantee perfect attribution.
Your analytics, consent setup, redirects, CRM and Calendly configuration all affect what information is ultimately available.
For a lead-generation website, think about the complete journey:
Marketing source
↓
Website
↓
Elementor page
↓
Calendly
↓
Booking
↓
Analytics / CRM
That is the system worth measuring—not just the button click.
Why Is Calendly Not Showing in Elementor?
If you have pasted the code and the scheduler does not appear, work through the problem systematically.
1. Check the published page
Do not rely only on Elementor’s editor.
Open the actual published URL in a private/incognito browser window.
This removes some editor-specific variables and gives you a better representation of what visitors see.
2. Confirm the Calendly URL
Check the data-url in the embed code.
Make sure it points to the correct Calendly event or scheduling page.
3. Inspect the browser console
Open your browser’s developer tools and select Console.
Look for JavaScript errors.
A separate plugin or script can sometimes cause JavaScript problems that affect other scripts on the page.
4. Temporarily test JavaScript optimization
If Calendly stopped working after activating a caching or optimization feature, temporarily test with JavaScript delay/defer or related optimization disabled.
If the scheduler immediately starts working, investigate that optimization setting.
5. Check Elementor containers
If the scheduler loads but looks compressed, inspect:
- Container width
- Minimum height
- Overflow
- Padding
- Margins
- Popup dimensions
- Responsive settings
6. Check for duplicate scripts
If Calendly has been inserted in several locations, inspect the page source and confirm that the external Calendly script is not unnecessarily declared multiple times.
7. Test without aggressive optimization
If the page still fails, temporarily test the page with relevant performance features disabled.
If that resolves the problem, re-enable features one at a time until you identify the conflict.
This approach is considerably faster than repeatedly replacing working Calendly code.
Why Is My Calendly Calendar Cut Off?
A cut-off calendar is often a sizing problem rather than a Calendly account problem.
Check the height of the embed first.
For example:
height:700px;
may need to be increased depending on the booking flow.
Then inspect the Elementor parent container.
Look for:
- Fixed heights
- Maximum heights
- Overflow rules
- Hidden overflow
- Popup dimensions
- Mobile-specific settings
Also check whether auto-resize is being used.
The important thing is to identify which element is actually limiting the visible area before changing the Calendly code.
Why Does Calendly Have a Second Scrollbar?
If you see a scrollbar inside the page in addition to the browser’s normal scrollbar, Elementor’s overflow handling is one of the first things to inspect.
Calendly specifically documents an Elementor issue involving overflow-y:auto and recommends setting the relevant Calendly widget overflow appropriately.
A commonly used fix is:
.calendly-inline-widget {
    overflow-y: hidden !important;
}
Test this on the actual published page after clearing caches.
Why Does Calendly Work in Elementor but Not on the Live Page?
This is usually a sign that something differs between the editor environment and the published page.
Check:
- Caching
- JavaScript optimization
- CDN settings
- Security plugins
- Cookie/consent systems
- Minification
- Deferred scripts
- Theme JavaScript
- Other third-party scripts
The editor is not the final visitor environment.
Always perform a final test on the published URL.
Can You Use Calendly Without Leaving WordPress?
Yes.
The purpose of Calendly’s website embeds is to let visitors interact with the scheduling experience without having to navigate away from your website. Calendly supports inline, pop-up text and pop-up widget implementations for this purpose.
The actual scheduling system remains hosted by Calendly, but the booking experience can be presented within your WordPress website.
That is one reason the embed approach is usually preferable to trying to rebuild the scheduling functionality inside Elementor.
What About an iframe?
Calendly’s current developer documentation also describes a direct iframe method.
For example:
<iframe
    src="https://calendly.com/your-name/30min"
    style="width:100%;min-width:320px;height:700px;"
    frameborder="0">
</iframe>
However, Calendly notes that the iframe approach does not provide the same auto-resize or event-tracking capabilities available through its JavaScript embed.
For most Elementor websites, I would therefore start with Calendly’s generated embed rather than replacing it with a manually created iframe.
Use the simplest method that provides the functionality you actually need.
A Better Booking Page Structure in Elementor
A good Calendly integration is not just a calendar placed somewhere on the page.
The surrounding page should answer the visitor’s basic questions before they start booking.
A service-based booking page could use this structure:
Hero section
Book Your Consultation
Choose a convenient time to speak with our team.
What the appointment includes
Briefly explain what will happen during the consultation.
What to expect
Mention the duration, meeting method and anything the visitor needs to prepare.
Calendly section
Place the scheduler in a spacious container.
After booking
Explain what happens next.
For example, tell the visitor whether they will receive:
- A confirmation email
- A calendar invitation
- A video meeting link
- Preparation instructions
- A follow-up message
This approach is more useful than simply putting a “Book Now” heading above a calendar.
Final Calendly + Elementor Checklist
Before considering the integration finished, test the complete visitor experience.
Installation
- Correct Calendly event is being used
- Correct embed code was copied
- Embed is placed in Elementor
- Published page displays the scheduler
Layout
- Calendar has enough width
- Height is appropriate
- Desktop layout works
- Tablet layout works
- Mobile layout works
- No unwanted horizontal scrolling appears
- No unnecessary inner scrollbar appears
Functionality
- Dates can be selected
- Available times load
- Visitor details can be submitted
- Booking completes successfully
- Confirmation appears
- Confirmation email is received
Performance
- Calendly loads after caching is enabled
- JavaScript optimization does not break the scheduler
- CDN/Cloudflare settings have been tested
- Calendly’s external script is not unnecessarily duplicated
Conversion tracking
- Important Calendly interactions are tracked where needed
- Completed bookings are distinguishable from button clicks
- Paid campaign attribution is tested
- CRM/analytics receives the expected information
Do the final test after your caching and optimization settings are configured, not only immediately after inserting the Calendly code.
Frequently Asked Questions
Can I add Calendly to WordPress with Elementor?
Yes. Calendly provides embed code that can be added to an Elementor page using the HTML widget or, according to Calendly’s current WordPress instructions, the Shortcode widget.
Do I need a Calendly plugin for Elementor?
No. A direct Calendly embed is sufficient for many websites. A plugin may be useful when you need additional functionality that the standard embed does not provide.
Which Calendly embed is best for Elementor?
For a dedicated booking page, an inline embed is usually the simplest choice. For pages where space is limited, a pop-up text or pop-up widget can provide a cleaner experience. Calendly officially supports all three approaches.
Why is my Calendly widget creating another scrollbar?
Elementor can add overflow-y:auto to the Calendly widget, which can result in an additional scrolling area. Calendly documents this issue and recommends controlling the widget’s overflow.
Why is Calendly cut off on mobile?
Check the height of the embed and the Elementor parent container. Mobile layouts often need different spacing or height from desktop. Also inspect any fixed-height or overflow settings applied by Elementor.
Can Calendly be placed inside an Elementor popup?
Yes. You can use Calendly’s popup options or place an inline embed inside an Elementor popup. If using an inline embed in an Elementor popup, make sure the popup provides enough space for the scheduler to calculate its layout correctly.
Can I track when someone actually books through Calendly?
Yes. Calendly’s advanced embed supports event tracking, including the calendly.event_scheduled event.
Can I automatically resize the Calendly embed?
Yes. Calendly currently supports an auto-resize option for its embed. However, Calendly recommends using only one auto-resizing embed per page and notes some limitations with dropdown-based booking or routing forms.
Can I style Calendly with Elementor?
You can style the Elementor section surrounding Calendly and control its placement, spacing and dimensions. The internal scheduling interface is controlled by Calendly and its available embed customization options.
Final Thoughts
Adding Calendly to Elementor is easy when you look only at the embed code.
Building a Calendly integration that actually works well for visitors requires a little more attention.
The code needs to be placed in the right Elementor widget. The surrounding container needs enough space. Mobile needs to be tested separately. Overflow settings need to be checked. Performance plugins should not interfere with Calendly’s JavaScript. And if the website depends on bookings for leads, the completed booking should be tracked rather than treating every button click as a conversion.
For most Elementor websites, the best approach is still the simplest one: use Calendly’s current generated embed, give it a properly sized Elementor container, test the published page on real devices, and only add custom JavaScript or advanced tracking when there is a genuine need for it.
If your Calendly integration is currently broken, displaying incorrectly on mobile, producing extra scrollbars, conflicting with Elementor or failing after a caching/optimization change, the problem is usually diagnosable without rebuilding the entire page.
Ashfaq Digital can help with the Elementor implementation, responsive layout, JavaScript conflicts, performance compatibility and conversion tracking so the booking system works as part of the website rather than simply appearing on the page.